Cisco ACI - Access Policies - Part1
Do you have a brand new Cisco ACI Fabric and don’t know where to start? Read this blog post and take action! 😉
Prerequisites
You must have a Cisco ACI Fabric up and running, if you don’t have it here are some posts that could be useful for you:
Cisco ACI sandbox
If you don’t have a Cisco ACI fabric, you can use the public sandbox to do some of the following tasks, here are the login details:
- URL: https://sandboxapicdc.cisco.com/
- USERNAME: admin
- PASSWORD (updated 05/03/2024): !v3G@!4@Y
Before changing something consider that this is a lab environment used by thousand of engineers 😉 be respectful and careful
Out Of Band and InBand IP addresses
After the discovery phase (completed in the previous blog posts), you probably would like to add an IP address to each fabric devices in order to check fabric details, switch information and more. To do that, you must configure one or more IP addresses to your devices:
- OOB: The Out-Of-Band IP address will be configured in the mgmt0 interface of the devices (usually it’s the physical interface near the console port). This interface shoul be attached to your Out-Of-Band network infrastructure
- InBand: The InBand IP address will be configured in a separate VRF called “inb” (configured by the system during the bootstrap, it’s inside the “mgmt” tenant)
Configuration Path:
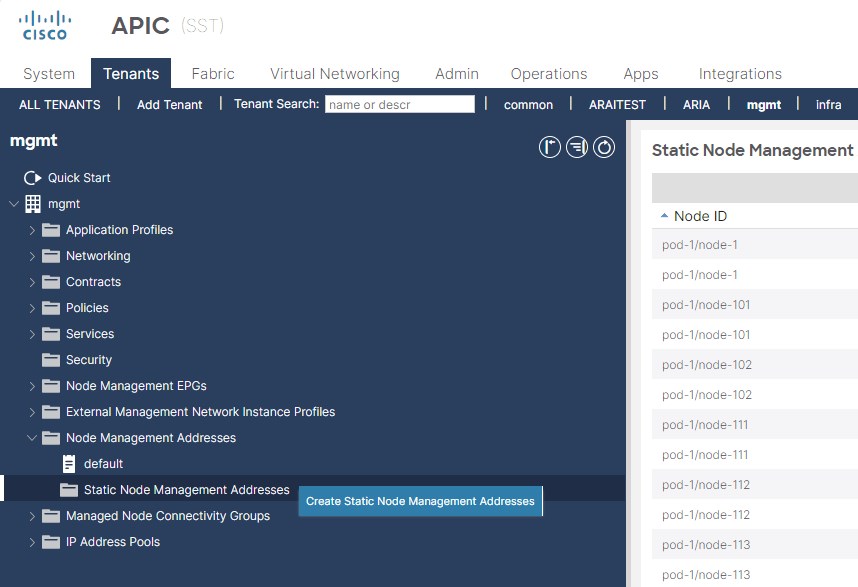
Tenants -> mgmt -> Node Management Addresses -> Static Node Management Addresses
Right click on the “Static Node Management Addresses” and create it:
The system will ask you the node range, here you should add the Leaves/Spines range to configure sequentially the IP Addresses
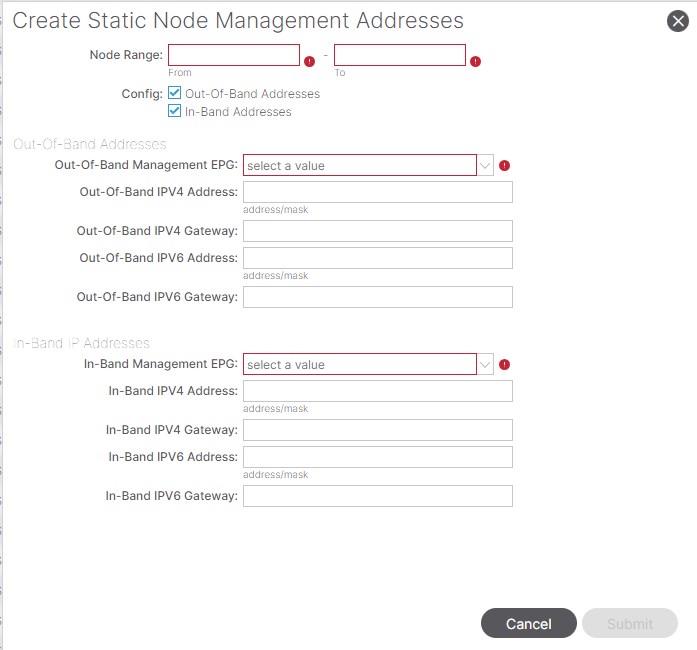
I.E.
- Node range: 111-124
- Config: Check OOB and/or In-Band addresses
Fill the fields with your values and the check the result:
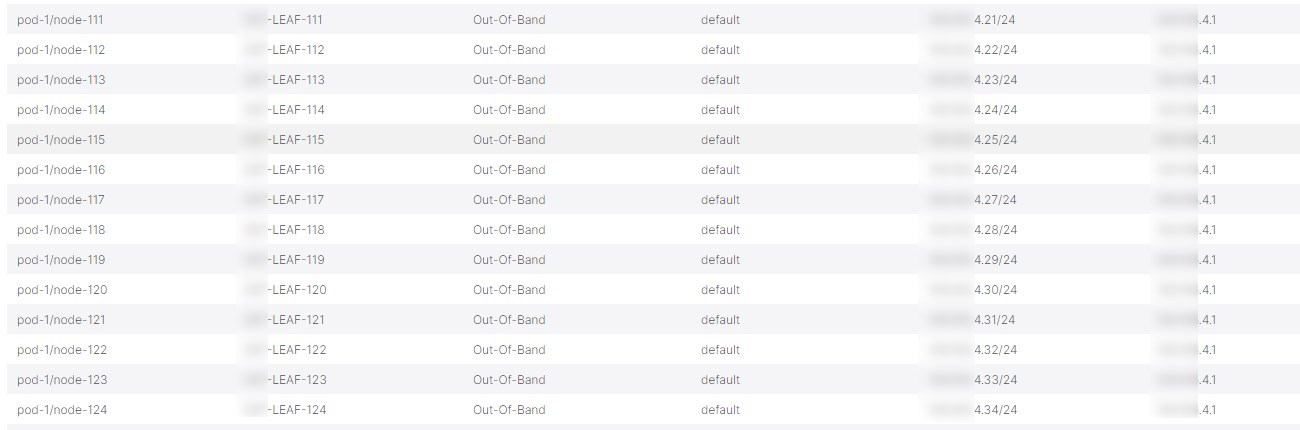
As you can see, the APIC will assign an IP address to all the devices in the range, starting from the lowest Node ID.
vPC Configuration
Before, let’s check the vPC status on both leaves, Access the CLI of the leaves through the OOB IP addresses that you configured in the previous task:
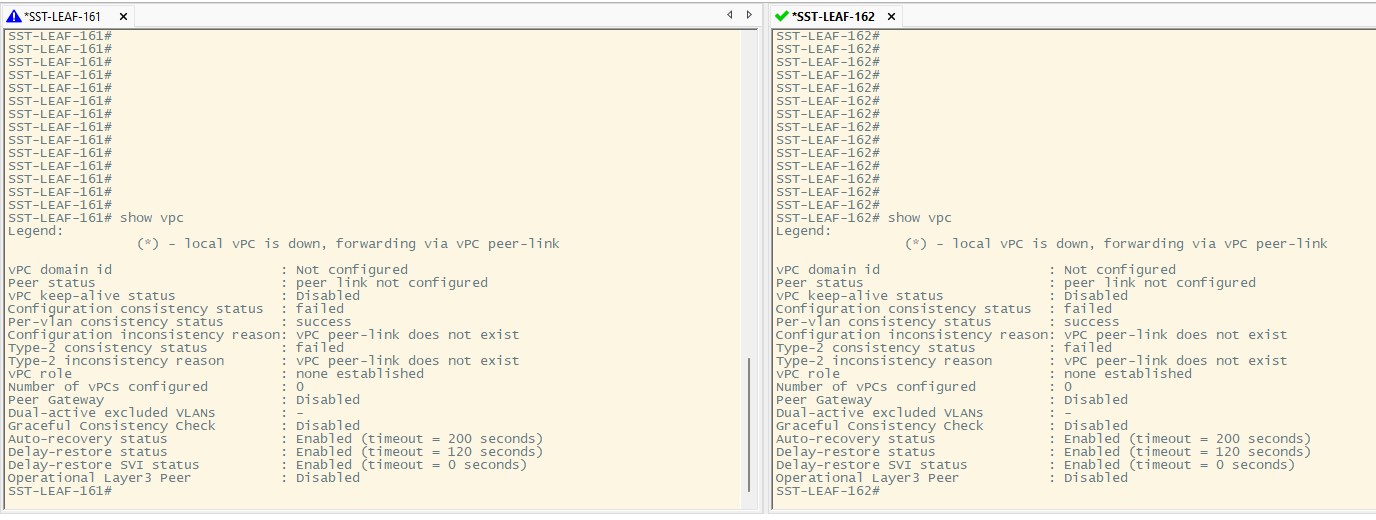
As you can see, the vPC is not configured! Let’s do it and move to the APIC GUI. Configuration Path:
Fabric -> Access Policies -> Policies -> Switch -> Virtual Port Channel default
Now that you are here, click on “+” in order to create a new vPC Pair
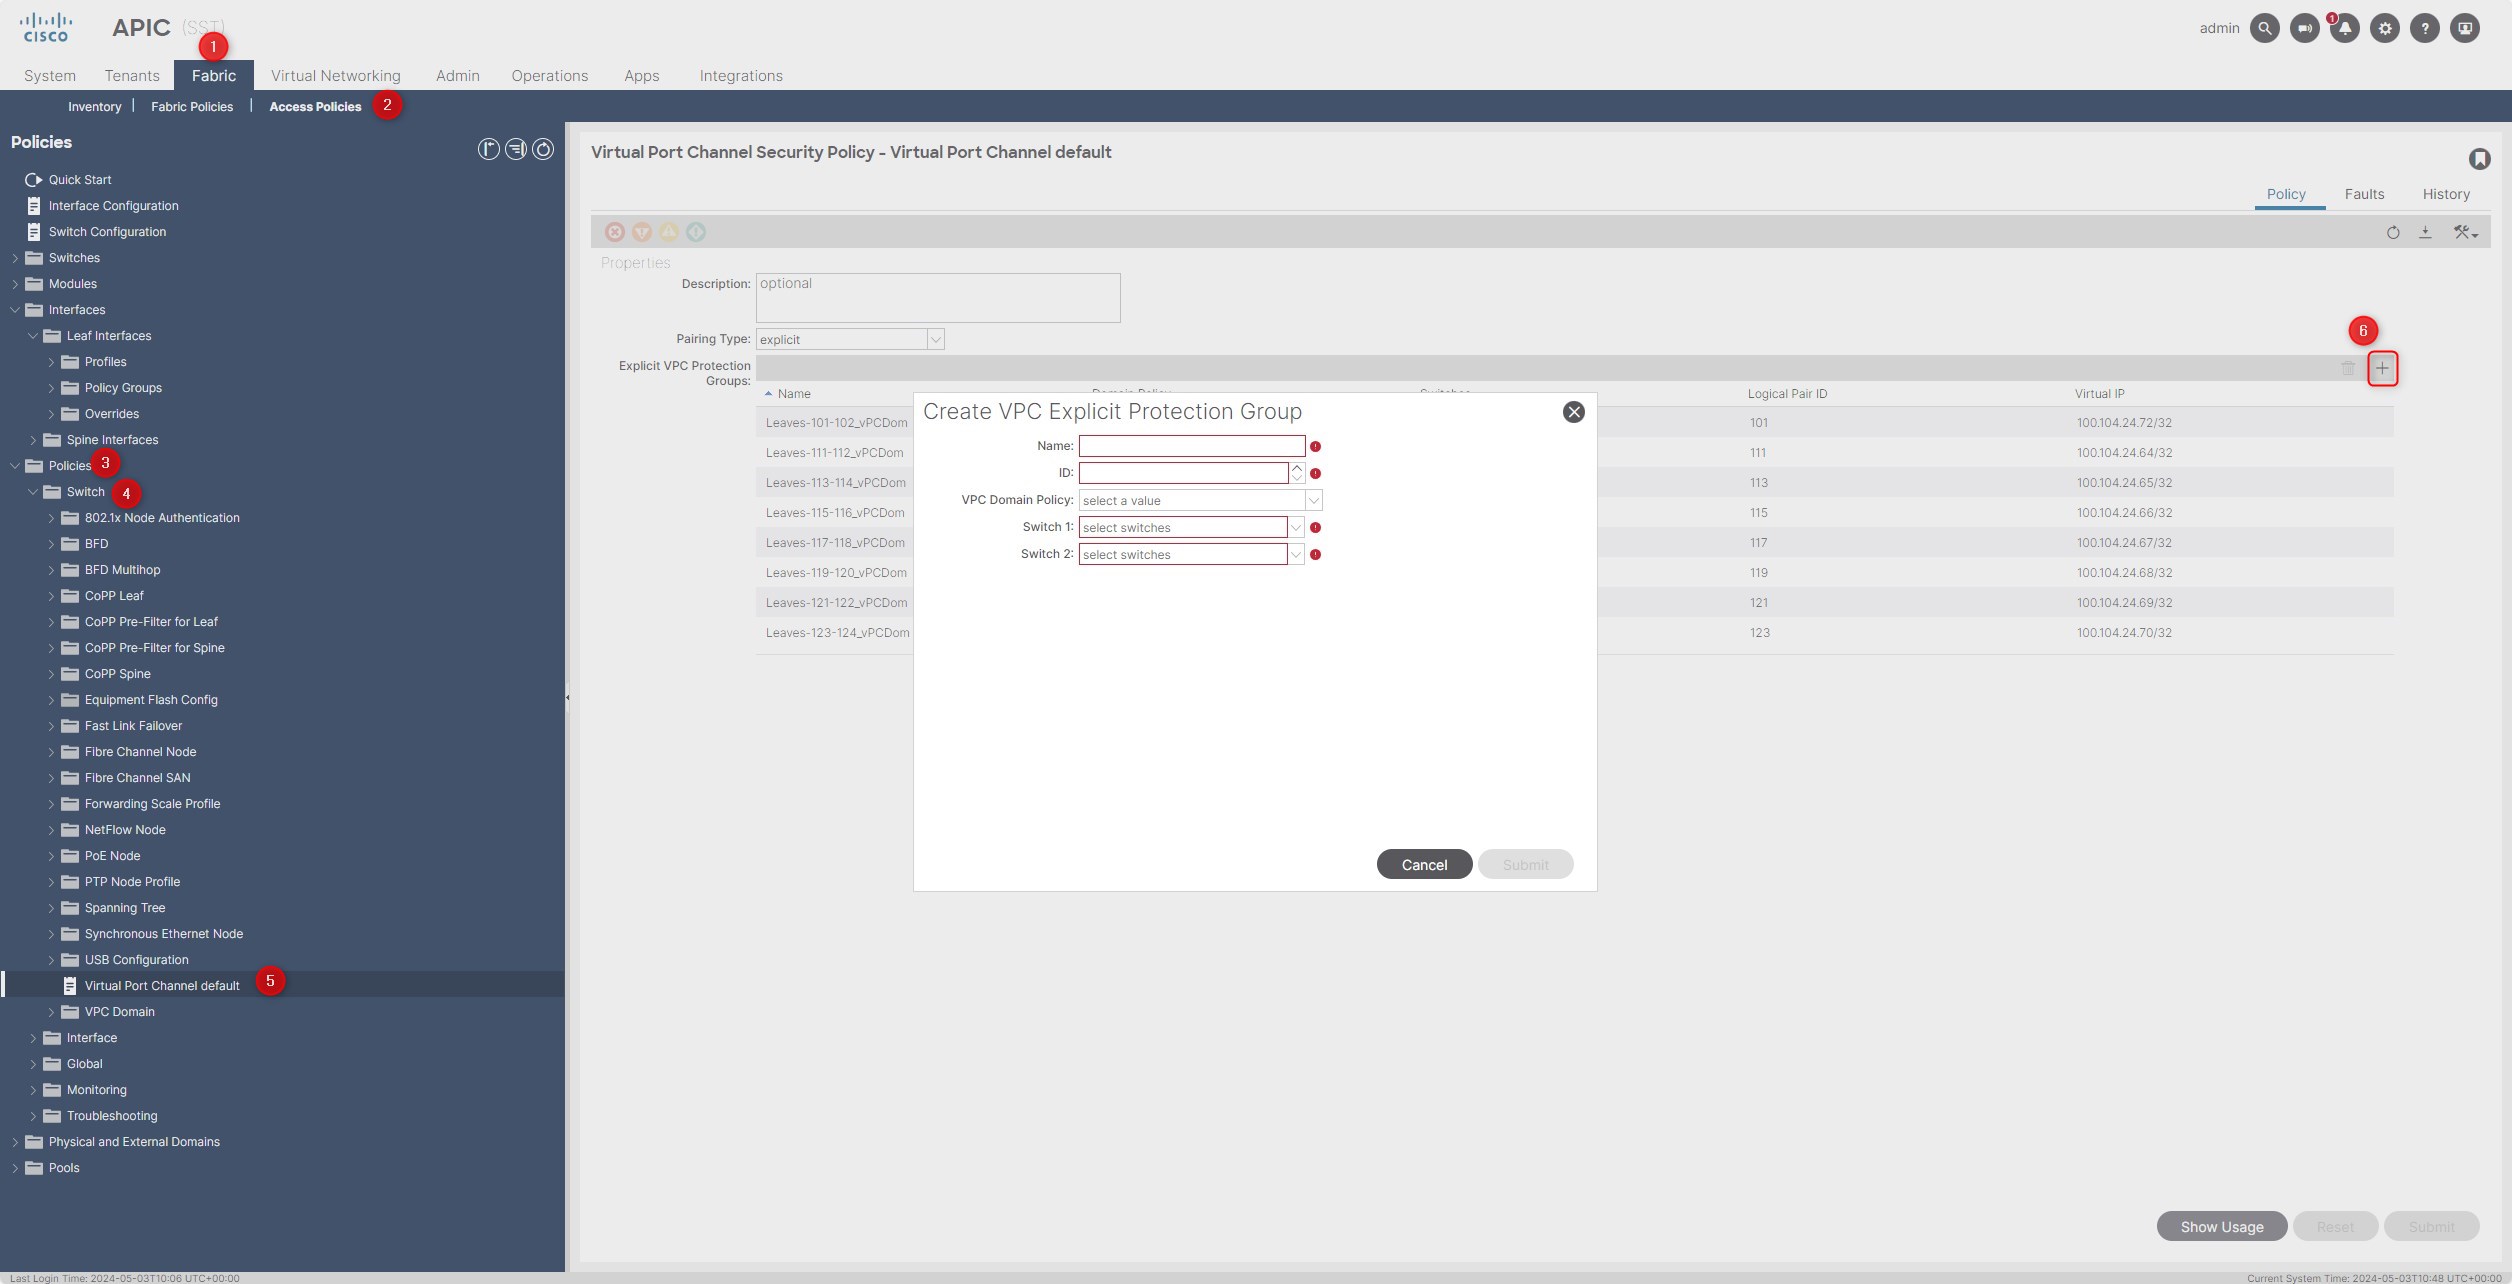
Here you have to fill some information in the relative fields:
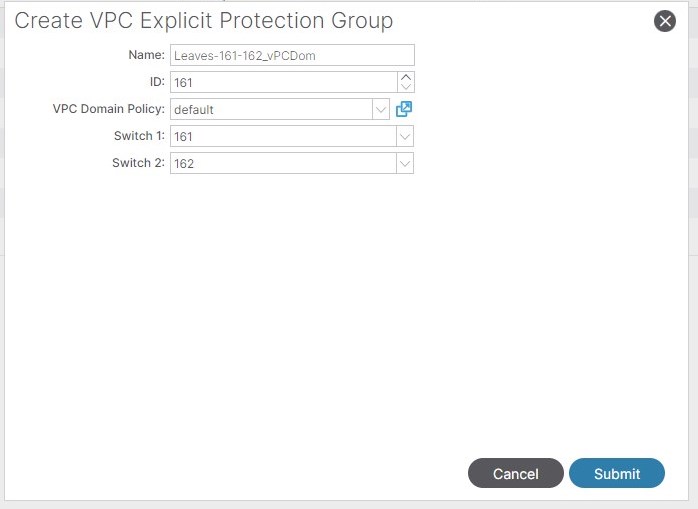
- Name: The name of the policy. Here is my standard: “Leaves-ID1-ID2_vPCDom” –> i.e. “Leaves-161-162_vPCDom”
- ID: The vPC Domain ID. Usually I put the lowest ID of the Nexus ID peers –> Leaf 161 and Leaf 162, the ID will be 161
- VPC Domain Policy: Leave the default one
- Switch 1: Select the ID of the Peer1
- Switch 2: Select the ID of the Peer2
Here an example:
Check the vPC status on Leaf 161 and Leaf 162:
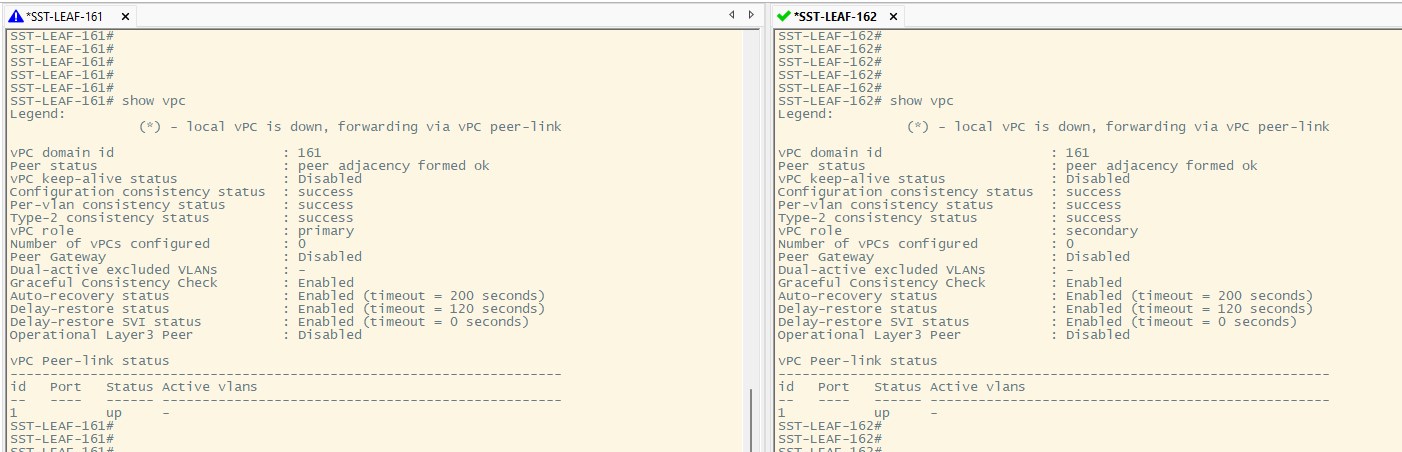
Perfect, you’ve successfully configured a vPC Domain!
Leaf Interfaces Profile
An interface profile is a policy that contains a port selector. The port selector is used to specify a particular port number. (Note that you are not yet specifying which leaf node you want to apply the policy to; that happens in the next step).
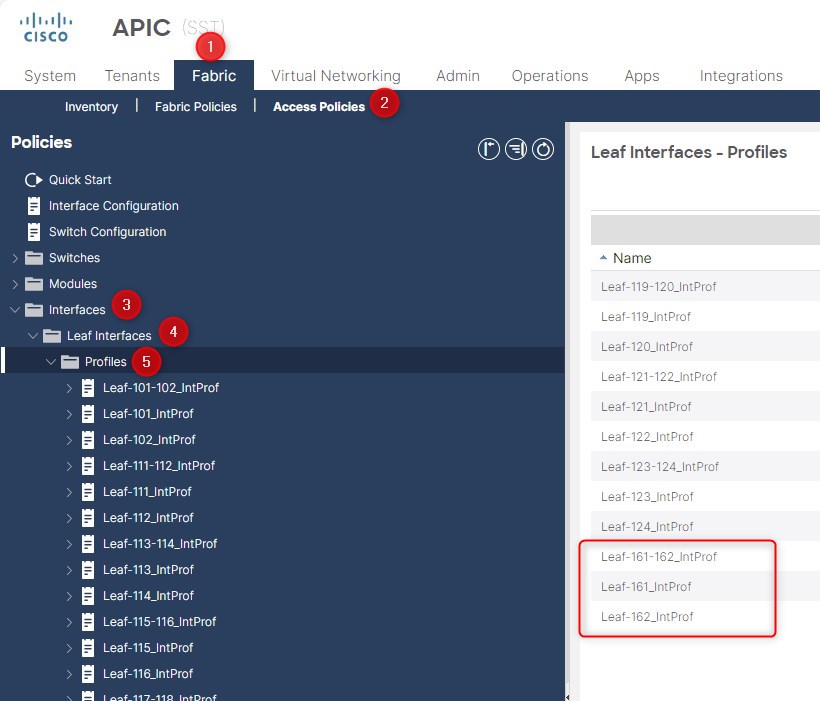
Create a Leaf Interface Profile, Configuration Path:
Fabric -> Access Policies -> Interfaces -> Leaf Interfaces -> Profiles
From here, right click on “Profiles” and then create it. Here you’ll need to fill only the “Name” field, you can ignore other fields. Here is my logic:
- Interface Profile for a Single Leaf (vPC Peer1): Leaf-161_IntProf
- Interface Profile for a Single Leaf (vPC Peer2): Leaf-162_IntProf
- Interface Profile for a vPC Domain: Leaf-161-162_IntProf
Leaf Switches Policy Group
Create a Leaf Switch Policy Group, which includes all the Policies related to all the Leaves.
Configuration Path:
Fabric -> Access Policies -> Switches -> Leaf Switches -> Policy Groups
From here, right click on “Policy Groups” and then create it:
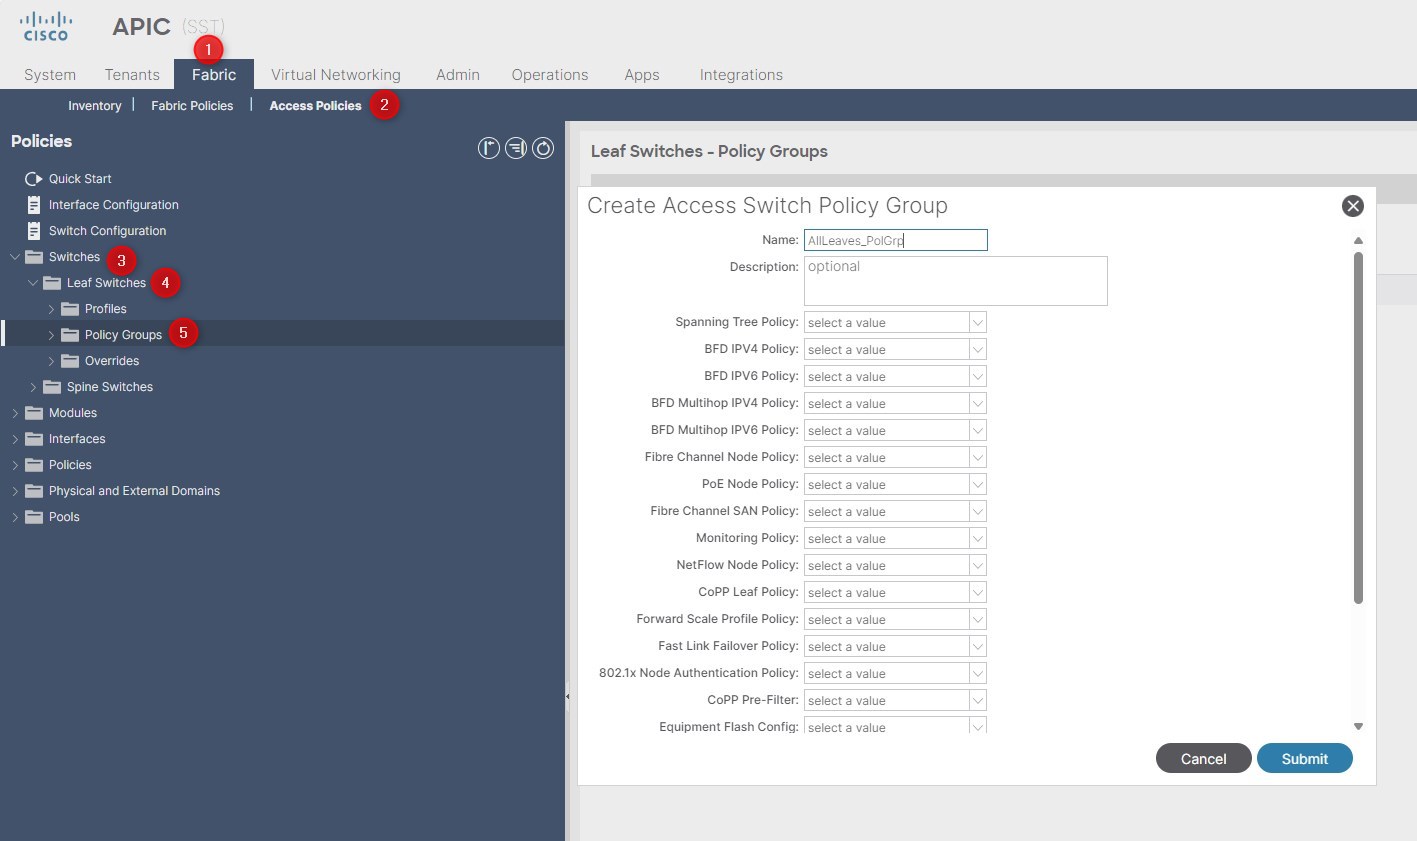
Name: AllLeaves_PolGrp
If you want to add specific policies for all the Leaves, you can configure them. In out scenario, we’ll not change the default configuration.
Leaf Switches Profile
Create a Leaf Switch Profile, which will allow you to to select your switches where configuration will be pushed and with Leaf Interface Profile will be associated.
Configuration Path:
Fabric -> Access Policies -> Switches -> Leaf Switches -> Profiles
From here, right click on “Profiles” and then create it. Here are the configuration details:
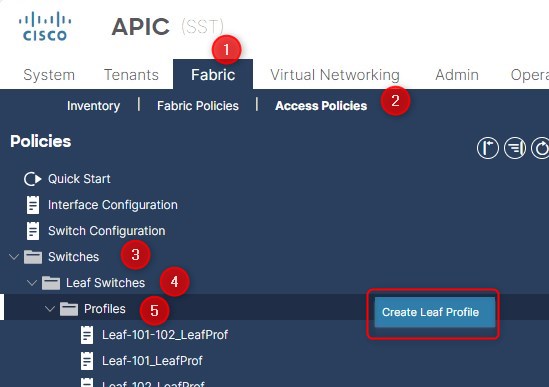
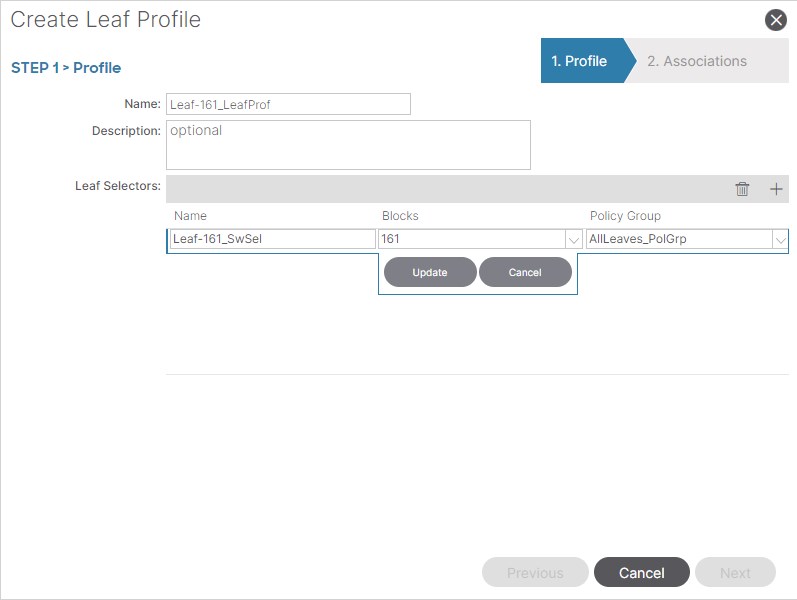
Step 1: Profile - Name:
- Switch Profile for a Single Leaf (vPC Peer1): Leaf-161_LeafProf
- Switch Profile for a Single Leaf (vPC Peer2): Leaf-162_LeafProf
- Switch Profile for a vPC Domain: Leaf-161-162_LeafProf
Step 1: Leaf Selectors Name:
- Switch Selector for a Single Leaf (vPC Peer1): Leaf-161_SwSel
- Switch Selector for a Single Leaf (vPC Peer2): Leaf-162_SwProf
- Switch Selector for a vPC Domain: Leaf-161-162_SwProf
Step 1: Leaf Selectors Blocks:
- Switch Blocks for a Single Leaf (vPC Peer1): 161
- Switch Blocks for a Single Leaf (vPC Peer2): 162
- Switch Blocks for a vPC Domain: 161-162
Step 1: Leaf Policy Group:
- Leaf Policy Group for all the scenarios: AllLeaves_PolGrp
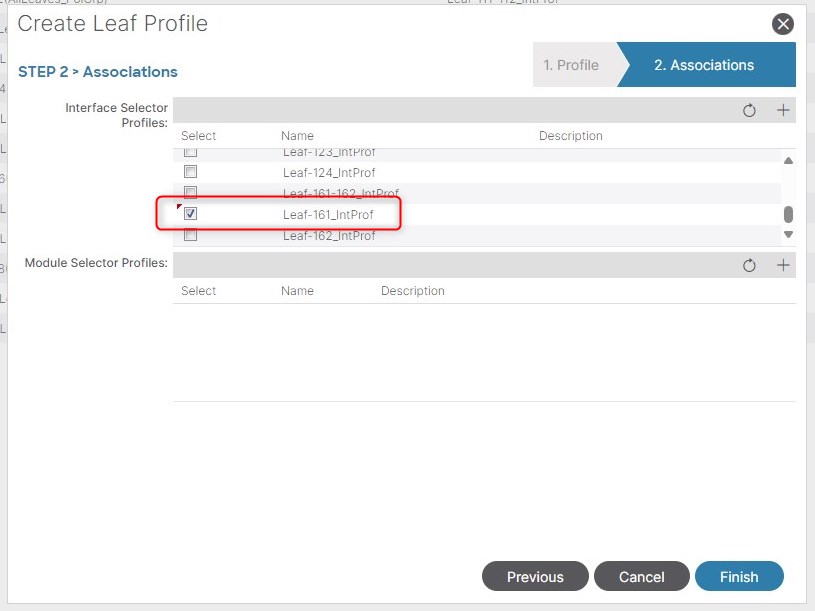
Step 2: Interface Selector Profiles:
- Interface Profile for a Single Leaf (vPC Peer1): Leaf-161_IntProf
- Interface Profile for a Single Leaf (vPC Peer2): Leaf-162_IntProf
- Interface Profile for a vPC Domain: Leaf-161-162_IntProf
Final Result:
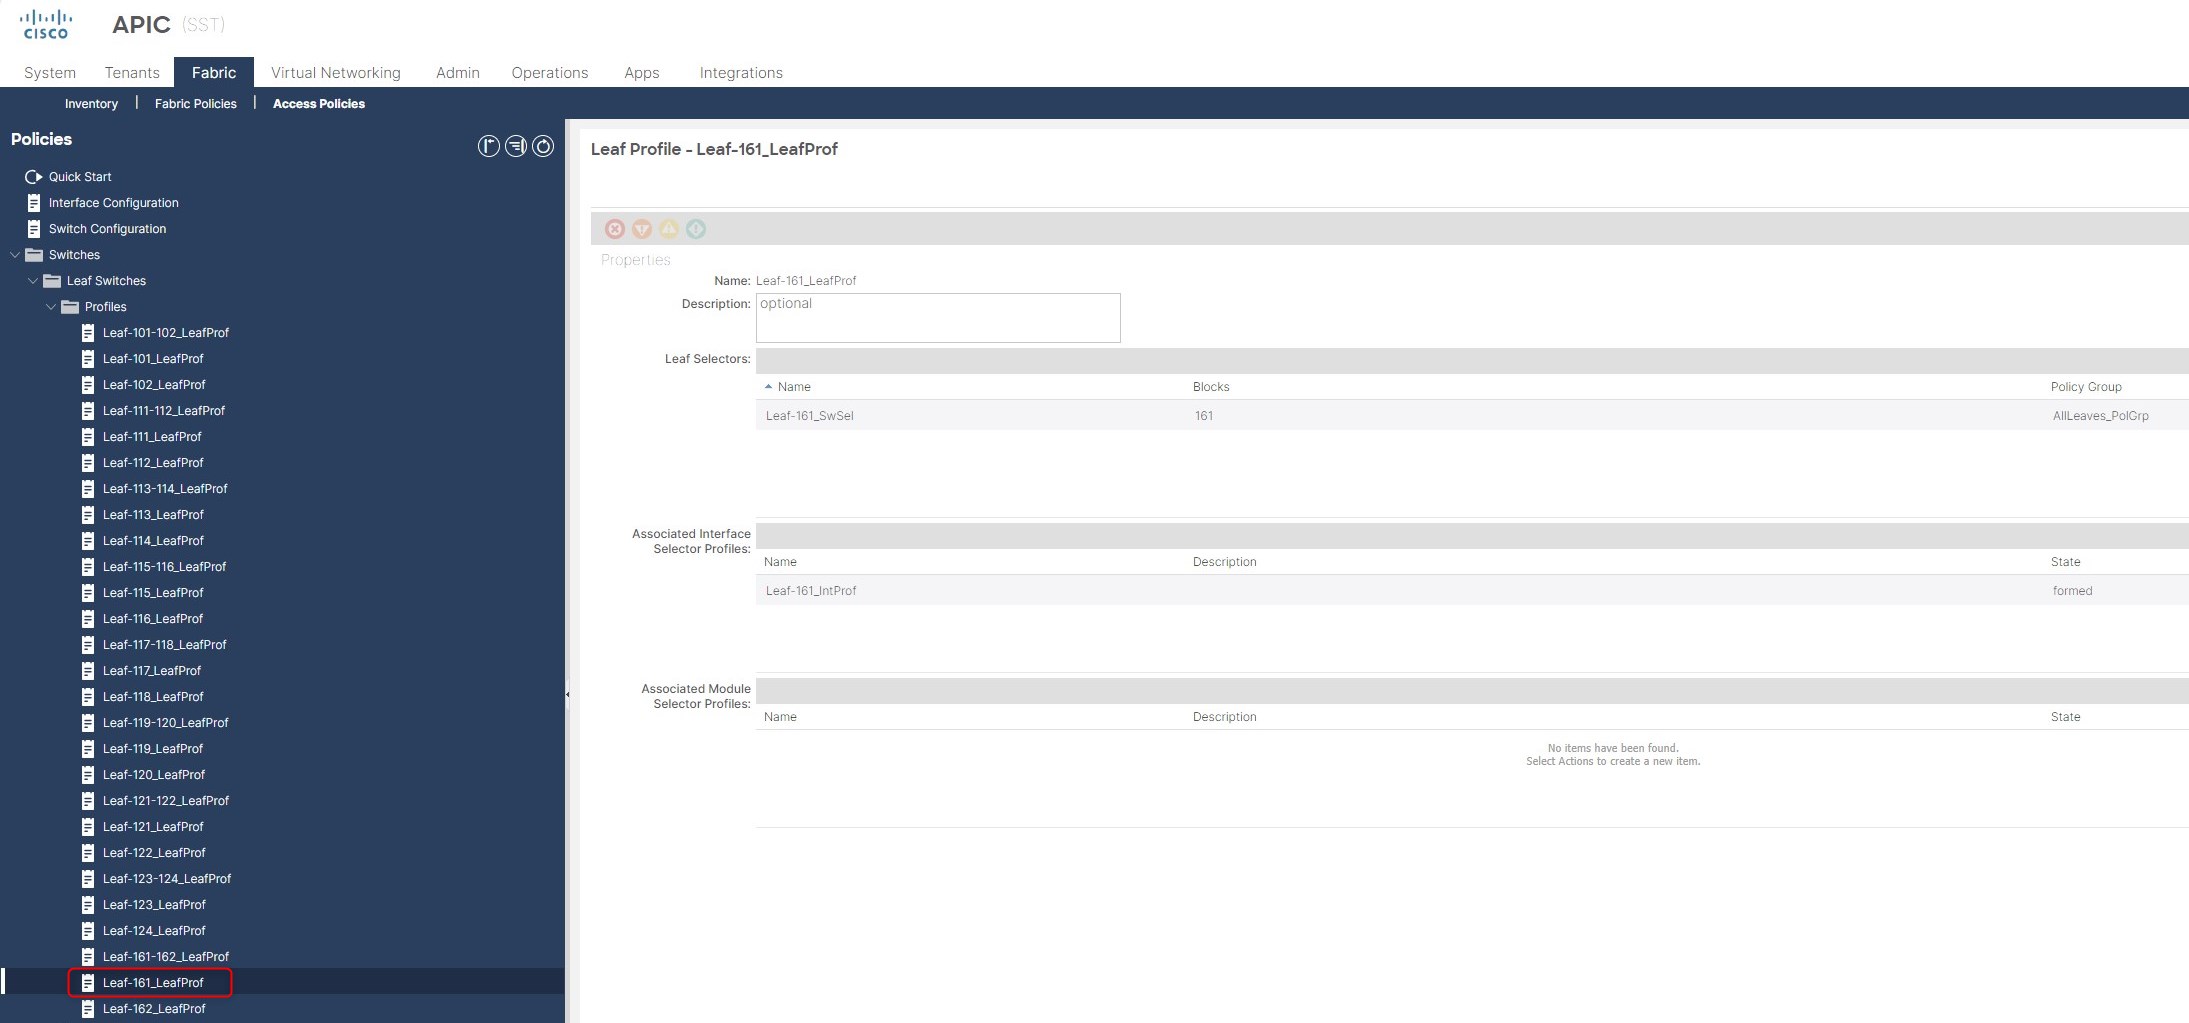
Perfect! Now scale to all the necessary Nodes 😊
Small recap
Here are two common tables in order to map and document all the previous data:
vPC Domains: | vPC_Domain_Name | vPC_ID | vPC_Switch1_ID | vPC_Switch2_ID | |———————–|————|——————–|——————–| | Leaves-101-102_vPCDom | 101 | 101 | 102 | | Leaves-111-112_vPCDom | 111 | 111 | 112 | | Leaves-113-114_vPCDom | 113 | 113 | 114 | | Leaves-115-116_vPCDom | 115 | 115 | 116 | | Leaves-117-118_vPCDom | 117 | 117 | 118 | | Leaves-119-120_vPCDom | 119 | 119 | 120 | | Leaves-121-122_vPCDom | 121 | 121 | 122 | | Leaves-123-124_vPCDom | 123 | 123 | 124 | | Leaves-161-162_vPCDom | 161 | 161 | 162 |
Leaf Profiles: | Leaf_Interface_Profile | Leaf_Switch_Profile | Leaf_Switch_Selector | Leaf_Selector_Blocks | |—————————-|————————-|————————–|————————–| | Leaf-101_IntProf | Leaf-101_LeafProf | Leaf-101_SwSel | 101 | | Leaf-102_IntProf | Leaf-102_LeafProf | Leaf-102_SwSel | 102 | | Leaf-101-102_IntProf | Leaf-101-102_LeafProf | Leaf-101-102_SwSel | 101-102 | | Leaf-111_IntProf | Leaf-111_LeafProf | Leaf-111_SwSel | 111 | | Leaf-112_IntProf | Leaf-112_LeafProf | Leaf-112_SwSel | 112 | | Leaf-111-112_IntProf | Leaf-111-112_LeafProf | Leaf-111-112_SwSel | 111-112 | | Leaf-113_IntProf | Leaf-113_LeafProf | Leaf-113_SwSel | 113 | | Leaf-114_IntProf | Leaf-114_LeafProf | Leaf-114_SwSel | 114 | | Leaf-113-114_IntProf | Leaf-113-114_LeafProf | Leaf-113-114_SwSel | 113-114 | | Leaf-115_IntProf | Leaf-115_LeafProf | Leaf-115_SwSel | 115 | | Leaf-116_IntProf | Leaf-116_LeafProf | Leaf-116_SwSel | 116 | | Leaf-115-116_IntProf | Leaf-115-116_LeafProf | Leaf-115-116_SwSel | 115-116 | | Leaf-117_IntProf | Leaf-117_LeafProf | Leaf-117_SwSel | 117 | | Leaf-118_IntProf | Leaf-118_LeafProf | Leaf-118_SwSel | 118 | | Leaf-117-118_IntProf | Leaf-117-118_LeafProf | Leaf-117-118_SwSel | 117-118 | | Leaf-119_IntProf | Leaf-119_LeafProf | Leaf-119_SwSel | 119 | | Leaf-120_IntProf | Leaf-120_LeafProf | Leaf-120_SwSel | 120 | | Leaf-119-120_IntProf | Leaf-119-120_LeafProf | Leaf-119-120_SwSel | 119-120 | | Leaf-121_IntProf | Leaf-121_LeafProf | Leaf-121_SwSel | 121 | | Leaf-122_IntProf | Leaf-122_LeafProf | Leaf-122_SwSel | 122 | | Leaf-121-122_IntProf | Leaf-121-122_LeafProf | Leaf-121-122_SwSel | 121-122 | | Leaf-123_IntProf | Leaf-123_LeafProf | Leaf-123_SwSel | 123 | | Leaf-124_IntProf | Leaf-124_LeafProf | Leaf-124_SwSel | 124 | | Leaf-123-124_IntProf | Leaf-123-124_LeafProf | Leaf-123-124_SwSel | 123-124 | | Leaf-161_IntProf | Leaf-161_LeafProf | Leaf-161_SwSel | 161 | | Leaf-162_IntProf | Leaf-162_LeafProf | Leaf-162_SwSel | 162 | | Leaf-161-162_IntProf | Leaf-161-162_LeafProf | Leaf-161-162_SwSel | 161-162 |
Automation
Now that you understand the logic, you should start automating these tasks. They are repetitive and annoying if you have to do them for hundreds of leaves! 😉
In this GitHub repository
you will find some Ansible Playbooks that help you in provisioning the Access Policies.
For the tasks that we have seen in this blog post, please refer to the following folders:
- vPC_Domains
- Leaf_Interface_Profile
- Leaf_Switch_Profile
Each folder has 5 files:
- credentials.yml: Put here your fabric credentials (URL, Username and Password)
- main.yml: This is the code, you don’t need to change it
- simple.csv: Here you can find how to complete the “data.csv” file, which is the file that the ansible playbook will use to import the information
- data.csv: This is the file that you should modify with your leaves/spines/fabric information
- README.md: Contains the playbook instructions
So, you should modify only 2 files: data.csv and credentials.yml
Thanks for your time I hope that you’re enjoying my blog!
If you have some questions, please drop me a message through social networks!😊
👈 You can find the relative icons here on the left of the page
Riccardo